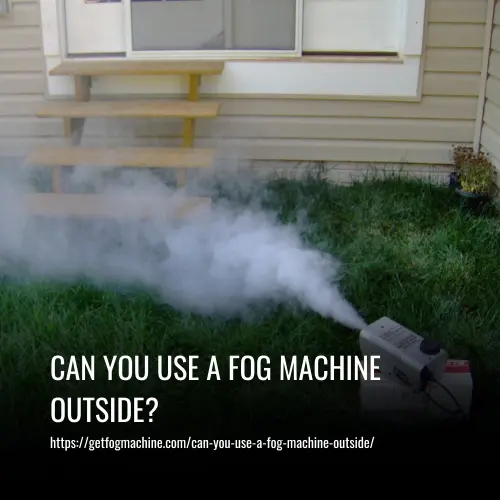
The short answer is yes, you can use a fog machine outside, but there are some important factors to consider before doing so. Safety is of utmost importance, and it is crucial to take proper precautions and follow the manufacturer’s instructions.
Advantages of Using a Fog Machine Outside
Fog machines are commonly used both in professional entertainment applications such as concerts, plays, and movies, as well as for personal use at parties and Halloween events. These machines can also be found in industrial, training, and some military applications.
When it comes to using a fog machine outdoors, there are numerous advantages to consider. For example, fog can enhance the visual effects of outdoor concerts, creating a more immersive audio-visual experience for the audience. It can also add suspense and thrill to horror movies or other outdoor events.
However, it is important to consider safety considerations when using a fog machine outside. Proper ventilation must be ensured to prevent respiratory irritation, and weather conditions such as wind and humidity levels must be taken into account to ensure the safety of individuals in the area. Overall, the benefits of using a fog machine outdoors can be immense, but care must be taken to ensure safe and responsible use.
Disadvantages of Using a Fog Machine Outside
While using a fog machine outdoors may seem like an exciting idea, there are several potential disadvantages to consider. Firstly, exposure to fog can be hazardous to health, particularly for people with respiratory tract problems such as asthma. The fog can also obscure visibility, which can be problematic for outdoor events that require accurate sightlines.
Moreover, the use of fog machines in certain weather or humidity conditions can also pose risks. In high humidity or windy conditions, the fog can linger for an extended period, creating a hazard for people moving around the area. Additionally, if not appropriately placed, the fog machine can damage electrical wiring or smoke detectors, which can lead to unforeseeable accidents.
When it comes to placing the fog machine or using it, incorrect placement or use can lead to potential harm to people and objects around it. For instance, an improperly placed fog machine can cause slipping hazards, or a fog machine that is too close to sensitive objects can cause damage to them.
To reduce these risks, proper ventilation, distance placement, and choosing the right type of fog machine for outdoor use are highly recommended. For outdoor events, it’s essential to choose a fog machine designed specifically for use outside and to place it in an area that’s well-ventilated to ensure dissipation. Proper distancing is also essential to avoid damaging nearby objects when the fog is released.
Safety Considerations When Using a Fog Machine Outside
When it comes to using a fog machine outside, there are several safety considerations to keep in mind. These include the type of fog machine being used, its placement, and the potential risks associated with its use.
Here, we’ll explore these considerations in more detail to ensure that using a fog machine outside is done safely and responsibly.
1. Weather Conditions and Humidity Levels
When using a fog machine outside, the impact of weather conditions and humidity levels should be taken into consideration. Fog machines work by vaporizing a fog fluid, such as glycol or glycerin mixed with water, and releasing it into the air. The effectiveness of the fog machine can be affected by weather conditions, including wind, humidity, and temperature.
Wind can scatter the fog in an unpredictable manner, making it difficult to achieve the desired effect. High humidity can cause the fog to linger low to the ground, making it less visible. On the other hand, low humidity can cause the fog to rise too quickly and become less visible as well. Therefore, it’s important to check the humidity levels before using a fog machine outside.
Temperature can also affect the effectiveness of the fog machine. Too high temperature can cause the fog fluid to burn, leading to harmful byproducts. Low temperature, on the other hand, can cause the fluid to decompose, which can also create toxic substances.
2. Placement and Distance from People or Objects
When placing a fog machine outdoors, it’s important to consider the safety of the people and objects in the area. The machine should be positioned in a safe location away from any flammable or fragile items. It’s also important to ensure that the power cord is not a tripping hazard and is placed in a way that people can walk around it safely.
When positioning the machine, it’s essential to keep it at least 6 feet away from any people or objects, such as furniture or equipment. This distance will ensure that the fog does not pose a risk to nearby individuals or damage any objects close by.
Choosing the Right Type of Fog Machine for Outside Use
When it comes to using fog machines outside, it’s essential to choose one that is specifically designed for outdoor use. This means selecting a machine that operates with water-based fluids or standard fog fluid with low mineral oil content to avoid harmful particle emissions.
Additionally, using a timer remote function to turn off the fog machine after a pre-determined amount of time can save energy and prevent overexposure to the fog. We explore the factors to consider when choosing the right type of fog machine for outside use.
1. Wattage Requirements
When it comes to using a fog machine outdoors, it is important to consider the wattage requirements. The wattage of the machine directly impacts the amount of power used, which affects the amount of fog produced and the machine’s ability to cover a specified area. Choosing a machine with too low wattage can result in the machine shutting off during use, which can be inconvenient when using it for events or performances.
A minimum of 600 watts is recommended for outdoor use to ensure that the machine does not shut off during use. More powerful machines can be used for larger areas or denser fog effects. However, higher wattage machines also consume more fog juice, which can be an important factor to consider when choosing the appropriate wattage for outdoor use.
The wattage of the machine affects the rate at which the fog juice is evaporated. Higher wattage machines typically cause the fog juice to evaporate faster, which means that it will produce a higher amount of fog more quickly. The desired density of the fog may also influence the decision when selecting the wattage of the machine.
2. Amount of Output Needed Per Minute
To determine the amount of fog output needed per minute for an outdoor event, a few factors must be taken into consideration. Firstly, the size of the area to be covered and the desired density of the fog should be analyzed. As a general rule of thumb, one gallon of fog solution should be used for every 1,000 square feet of area. This can provide a starting point for determining the amount of fog solution needed for the event.
Next, the wattage of the fog machine should be considered. The amount of fog produced per minute will vary depending on the wattage of the machine. It’s important to choose a machine that can produce enough fog to cover the desired area.
For events that require continuous fog, it’s crucial to have enough fog solutions and power to keep up with the demand. This means calculating the amount of fog solution needed for the entire event and ensuring that the fog machine has enough wattage to continuously produce the desired output.
3. Remote Control Options: Wired or Wireless
When it comes to using a fog machine outdoors, having a remote control option is a must-have feature. Two popular choices for remote control options are wired and wireless remotes.
Wired remotes allow for precise control over the amount of fluid flowing through the heat exchanger. This means you can control the amount and intensity of the fog generated by the machine. Wired remotes are ideal for use in outdoor settings because they offer a reliable connection over long distances and are not susceptible to interference from other devices.
Wireless remotes, on the other hand, offer greater convenience by eliminating the need for cables and wires. They allow for easy use and control from a distance, making them perfect for outdoor concerts or other events where mobility is important. Wireless remotes also offer DMX capability, which enables the integration with control consoles used in theme park attractions and other professional settings.
In addition to wired and wireless remotes, fog machines can also be integrated with various control systems, such as the 0-10V closed-contact control system. This feature allows for even more control over the fog produced, making it possible to adjust the intensity and burst of fog on demand.
4. Sizing the Machine for the Area to be Covered
When it comes to using a fog machine outside, it is important to appropriately size the machine for the area to be covered. Using a machine that is too small will not produce enough fog while using a machine that is too large could produce an overwhelming amount of fog for the designated space.
To ensure proper sizing, you must consider the wattage requirements and amount of output needed per minute to match the size of your space. The fog per minute rating on the machine, as well as the voltage and amperage, should also be reviewed to confirm compatibility with your power source.
Determine the coverage area specified for each machine, which can range from a few hundred square feet to over a thousand. This will guide you in choosing the right fog machine size for your outdoor event or concert.
5. Durability and Longevity Considerations
When selecting a fog machine, it’s important to consider its durability and longevity. This is particularly crucial if you’re looking to use your fog machine for extended periods of time, as well as for outdoor events and performances.
One of the first things to look for when selecting a fog machine is good reviews regarding its durability. Choosing a model that has a good track record of lasting at least one or two years before breaking down can save you from needless expenses on repairs and replacements down the line.
It’s worth noting that more expensive models may have a longer lifespan than their cheaper counterparts. However, this can often come at a higher cost upfront. It’s important to weigh the tradeoff between the price and longevity of the machine to determine what works best for your needs and budget.
Another factor to consider when it comes to longevity is the lifespan of the fog machine fluid. Different machines may use different types of fog juice, and there are a number of factors that can affect how long it lasts. These include the frequency of use, the amount of fog produced per minute, and the size of the machine.
6. Timer Functionality to Automate Use
When it comes to using fog machines outdoors, it’s important to consider the functionality that can help automate and control the fog output. One valuable feature to look for is timer functionality.
Timers allow users to schedule when the fog machine turns on and off, which can help conserve fog fluid and electricity while achieving a consistent and controlled effect. Some fog machines may come with built-in timers, while others may require a separate timer control module.
Timer controls typically offer options such as setting specific on and off times, adjusting the duration and frequency of fog output, and more. This level of control can be especially useful for outdoor events where fog effects may need to be synchronized with other elements of the performance.
7. Cost Efficiency Considerations
When considering a fog machine for outdoor use, cost efficiency is a key factor to consider. Wattage requirements, output amount needed per minute, and durability and longevity considerations all play a role in determining the ideal fog machine for your needs.
In addition to these factors, the type of fog machine fluid or fog juice used, the frequency of use, and the maintenance requirements can all impact the cost of operating a fog machine. Choosing high-quality fog juice can actually save money in the long run, as it may require less fluid to achieve the same output amount.
Another way to improve cost efficiency is to consider the timer functionality of a fog machine. By automating the use of fog machines, timers can help reduce energy costs and extend the lifespan of the machine. This is because the machine will only run for the intended duration and can be turned off when not needed, reducing wear and tear on the machine.
FAQs
Yes, you can use a fog machine outdoors, but there are factors to consider such as weather conditions, local regulations, and the type of event or location.
Absolutely. Ensure proper ventilation, especially in open spaces, to prevent the fog from becoming too dense. Check for any fire hazards or flammable materials nearby. Also, consider the impact on visibility for pedestrians or drivers.
The rate of dissipation depends on weather conditions like wind and temperature. In some cases, the fog may disperse more rapidly outside compared to indoors due to increased airflow.
Not all fog fluids are suitable for outdoor use. Some fluids are formulated for indoor environments and may not disperse effectively outside. Look for fog fluids specifically labeled for outdoor use.
To some extent, you can control the direction of the fog by adjusting the machine’s settings and the angle at which it emits fog. However, outdoor conditions like wind may influence the fog’s direction, making it challenging to have full control.
In certain areas or for specific events, local regulations might require permits for using fog machines outdoors, especially in public spaces. Check with local authorities or event organizers to ensure compliance with any necessary permits or restrictions.
Conclusion
In conclusion, using a fog machine outside is possible and can add a unique and impressive effect to any outdoor event or production. However, it is important to consider the power and output of the machine, as more powerful machines can produce large amounts of fog which may not be suitable for all outdoor settings.
It is also important to consider the safety concerns, such as ensuring proper ventilation and avoiding the use of smoke detectors or individuals with respiratory issues. By following these guidelines and selecting the appropriate machine and fluid, a fog machine can be a great addition to any outdoor occasion.