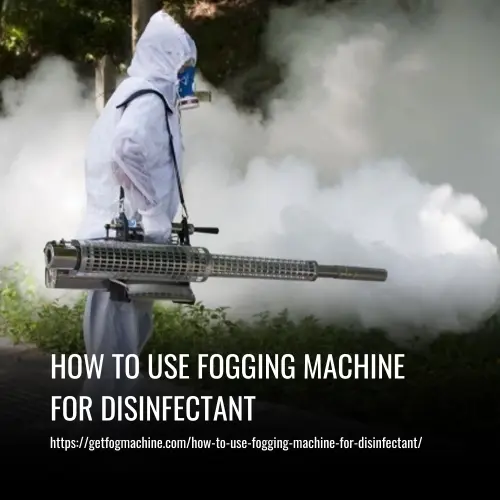
To use a fogging machine for disinfectant, start by spraying the fine mist on all possible surfaces in the area, including floors, furniture, walls, and ceilings. Work the disinfecting fogger in all directions to ensure thorough coverage. Once you have finished, unplug the machine and leave the area, making sure to close the door behind you.
Allow the disinfectant to do its job for the recommended period of time, which will depend on the specific product you are using. This could range from a few minutes to several hours. It is important to follow the instructions provided with the disinfectant product.
Fogging machines are a versatile and effective method for wide-scale disinfection, and they are particularly useful for reaching hard-to-reach places. By using a fogging machine, you can efficiently remove germs, impurities, and harmful microorganisms from surfaces, helping to protect against health risks such as infectious viruses.
How Does The Fogger Machine Work
The fogging machine is a versatile piece of equipment used for disinfection purposes. It works by converting disinfectant liquid, also known as fog fluid, into a fine mist or fog. There are two types of fogging machines: cold foggers and thermal foggers. Cold foggers use ultra-low volume (ULV) technology to create a cold mist, while thermal foggers heat up the liquid to form hot vapors.
The fogger machine is operated by pointing it at the targeted area, such as public spaces or medical equipment, and releasing the fog. The fog disperses throughout the space, reaching even hard-to-reach places, and effectively eliminating germs, bacteria, and other harmful microorganisms.
It is important to use the fogger machine with caution, as the spray or mist can linger in the air. Therefore, proper safety measures should be taken, such as allowing time for the solution to settle and keeping the area clear of people during treatment.
Why Use a Fogging Machine for Disinfection
There are several compelling reasons to use a fogging machine for disinfection. These machines are highly effective in eliminating germs and bacteria, ensuring a clean and safe environment for both residential and commercial spaces. Here’s why fogging machines are a popular choice for disinfection:
1. Effective
Fogging machines provide thorough disinfection by producing a fine mist that can reach all surfaces, including hard-to-reach areas. This ensures that every nook and cranny is properly disinfected, reducing the risk of illness and the spread of infections.
2. Fast
Fogging machines are known for their ability to cover large areas in a short amount of time. This makes them a time-saving option, especially for commercial spaces that need to be disinfected regularly. With a fogging machine, you can disinfect an area quickly and efficiently, without spending hours cleaning manually.
3. Convenient
Unlike traditional cleaning methods, fogging machines do not require you to move furniture or other items out of the way. This makes them highly convenient for use in homes and offices with limited space. Simply add the disinfectant solution, turn on the machine, and let it do the work for you.
4. User-friendly
Fogging machines are designed to be easy to use, allowing anyone to operate them effectively. Even if you have limited knowledge or experience in cleaning, you can still achieve thorough disinfection with a fogging machine. Just follow the manufacturer’s instructions and ensure proper safety measures.
5. Cost-effective
Fogging machines are a cost-effective solution for disinfection. They require a small amount of disinfectant to cover a larger area, saving you money on cleaning products in the long run. Additionally, the time and effort saved by using a fogging machine can outweigh the initial cost of the machine itself.
How to Use a Fogging Machine for Disinfection
Using a fogging machine for disinfection purposes can be a highly effective method to remove germs and harmful microorganisms from surfaces, especially in the midst of the COVID-19 pandemic. Fogging machines, also known as foggers, are versatile pieces of equipment that generate a fine mist or fog of disinfectant, allowing it to reach and target hard-to-reach places.
What You Need to Use a Forging Machine for Disinfection
- A fogging machine
- The right disinfectant for your needs
- Protective gear such as gloves, a mask, and protective clothing
An open area
Now that you have gathered the materials, here are the steps for using a fogging machine for disinfection.
To use a fogging machine for disinfection, follow the steps below:
1. Wear Protective Gear
Before you begin, ensure you have the proper protective gear on, including gloves, a mask, and eye protection. This will safeguard you from any potential health risks associated with the disinfectant products.
2. Prepare the Surface/Area of Concern
Remove any items that may obstruct the fogging machine’s nozzle, such as curtains, rugs, and furniture. Open doors and windows to provide proper ventilation during and after fogging. If possible, select an area that is well-ventilated and remove any valuables that could be damaged by the fogging mist.
3. Prepare the Disinfection Solution and Pour It into the Fogger Tank
Prepare the disinfection solution according to the instructions on the label. Once ready, pour the solution into the fogging machine’s tank. The amount of solution needed will depend on the size of the area you are fogging.
4. Set Up the Fogging Machine
Position the fogging machine in the center of the room or area to be disinfected. Ensure that the nozzle is pointing away from any surfaces you do not want to get wet. Follow the manufacturer’s instructions to fill the machine’s tank with the disinfectant solution. Plug the machine into an electrical outlet to power it.
5. Turn on the Machine
Once the fogging machine is set up, turn it on. The machine will emit a fine mist, aerosolizing the disinfectant and enabling it to reach all areas, including corners and crevices that may be hard to reach with traditional disinfectants. Carefully read and follow the manufacturer’s instructions.
6. Start Fogging
As the fogging machine is running, move around the room or area to ensure that all surfaces are evenly coated with the mist. Pay special attention to high-touch areas and commonly used surfaces. Remember to maintain a safe distance from the fogging machine to avoid direct exposure to the disinfectant mist.
After fogging, ventilate the area by opening doors and windows. Allow the space to air out for a few hours before returning any items. Fogging machines are powerful tools in the fight against infectious viruses and unseen pathogens when used correctly, and they can help maintain a clean and hygienic environment.
How to Use a Fogging Machine Indoors
Using a fogging machine indoors can help create a desired atmosphere or effectively disinfect specific areas. To ensure successful results, follow these steps:
1. Prepare the Area
Choose a well-ventilated space for fog machine use, as excessive fog can hinder visibility and breathing. Remove valuable items and eliminate potential tripping hazards. Close all windows and doors to contain the fog.
2. Place the Fog Machine
Select an appropriate location for the fog machine, preferably at the center of the area if using it for disinfection purposes. Ensure the surface is flat and stable to prevent any accidents or spills.
3. Set Up the Fog Machine
Plug the fogging machine into a properly grounded electrical outlet. Follow the manufacturer’s instructions to remove the lid and pour the appropriate fog fluid into the machine’s reservoir. Using the recommended fluid will prevent damage to the machine. Consider using a funnel to avoid spillage.
4. Start the Operation
Turn on the fog machine and allow it to warm up for approximately 5 minutes. Most machines have a manual button to initiate fog production. Some machines also come with a ready light that indicates when the machine is warmed up and ready for use. Additionally, if available, use the timer mode to automatically control the fog machine’s operation for a specified period of time.
How to Use a Fogging Machine Outdoors
When it comes to using a fogging machine outdoors, there are a few important considerations to keep in mind. Whether you want to disinfect your patio furniture or grill, here are the steps to effectively use the fogging machine outdoors:
1. Find a well-ventilated area
Choose an outdoor space with good ventilation to avoid the buildup of fog. This will ensure that the mist can disperse easily and reduce the risk of inhaling concentrated amounts of disinfectant.
2. Choose a windless day
It’s crucial to select a calm day with minimal wind. This ensures that the fog doesn’t blow away before it has had a chance to settle on the surfaces you want to disinfect. Wind can hinder the effectiveness of the fogging process.
3. Ensure sufficient fog fluid
Unlike indoor use, fogging outdoors typically requires more fog fluid. Be sure to check the reservoir frequently and refill it as needed. This will prevent the machine from running out of solution while in operation.
4. Beware of open flames
Never use the fogging machine near open flames. The fog can be highly flammable, posing a significant fire hazard. Keep a safe distance from any fire or heat sources such as candles, grills, or outdoor fire pits.
5. Evenly coat all surfaces
When fogging outdoors, move the machine around to ensure that all surfaces receive an even coating of the disinfectant fog. This will help ensure thorough coverage and effective disinfection.
6. Allow for proper ventilation
After you have finished fogging, turn off the machine and allow the area to air out. This will help dissipate the fog and enable the disinfectant to dry on surfaces.
By following these steps, you can safely and effectively use a fogging machine outdoors to disinfect various surfaces. Remember to always prioritize safety and follow the manufacturer’s instructions for your specific machine.
Use Fogging Machine to Disinfect a Car
Using a fogging machine to disinfect your car is essential for maintaining a clean and hygienic vehicle. When choosing a fogging machine, it’s crucial to select one specifically designed for car disinfection to prevent damage to your car’s paint and interior. Look for a machine that can accommodate a water-based disinfectant solution, as this will be safe for use on car surfaces.
To effectively disinfect your car, place the fogging machine in the middle of the backseat and ensure all doors and windows are open for proper ventilation. Move the machine around to evenly coat all surfaces with the disinfectant fog.
Once the fogging process is complete, turn off the machine and allow the car to ventilate for a few hours before driving. Following these steps will help ensure a thorough and safe disinfection of your car using a fogging machine.
Benefits Of Using The Fogging Machine For Disinfection
Here are some Benefits Of Using the fogging Machine for Disinfection.
1. Efficient Disinfection of Large Spaces
The use of a fogging machine for disinfection is especially beneficial for larger areas such as houses, buildings, and offices. The fine mist produced by the machine can reach every invisible corner of the space, ensuring thorough disinfection. This is particularly important as objects in these spaces tend to accumulate dust, bacteria, and even fungus over time.
2. Targeting High-Touch Surfaces
High-touch surfaces, such as doorbells, door handles, switches, and fridge doors, are common sources of bacterial and viral transmission. The fogging machine efficiently cleans these areas, eliminating harmful microorganisms and reducing the risk of infection.
3. Effective Cleaning of Hard-to-Reach Areas
The fogging machine proves to be a powerful tool in cleaning hard-to-reach areas that are challenging for humans to access. Side corners and dark rooms are effectively cleaned with the use of the fog spread by the machine. This ensures that every nook and cranny is thoroughly disinfected in a short amount of time.
4. Time-Saving Solution
The fogging machine’s ability to cover large areas quickly makes it a time-saving solution for disinfection. Instead of spending hours manually cleaning, the fogging machine can efficiently and effectively disinfect the space, allowing you to focus your time and energy on other tasks.
5. Improved Hygiene and Safety
By utilizing a fogging machine, you can ensure a high level of hygiene and safety in your living or working environment. The machine’s fine mist contains disinfectants that eliminate germs and bacteria, thus reducing the risk of illness and the spread of infections.
Safety Precautions to Take When Using Fogging Machine For Disinfecting
When using a fogging machine for disinfecting purposes, it is essential to prioritize safety to avoid accidents and health risks. Here are some important safety precautions to keep in mind:
1. Use Only Recommended Fogging Material
Follow the manufacturer’s recommendations and use the appropriate amount of fog fluid for your machine. Using too much can cause respiratory irritation while using the wrong type of disinfectant can damage the machine or pose risks to human health.
2. Keep the Machine Away from Ignition Sources
Fogging machines can get hot, so ensure they are placed at least 6 feet away from any ignition sources, such as electrical appliances, sparks, flames, or pilot lights. This will reduce the risk of accidental fires or explosions.
3. Inform Family Members and Neighbors
Notify your family members and neighbors about your intention to use a fogging machine for disinfection. This allows them to take necessary precautions, such as closing windows and doors, to avoid exposure to the disinfecting particles.
4. Cover Important Areas
Before starting the fogging process, cover or protect important items, such as utensils, expensive furniture, and food items, to prevent contamination. Also, close windows and doors to ensure the fog remains concentrated in the designated area.
5. Wear Protective Gear
When using a fogging machine with pesticides or potentially harmful disinfectants, it is essential to wear protective gear. This can include a non-paper respirator, protective glasses, gloves, closed-toe shoes, long-sleeved shirts, and long pants, to minimize the risk of allergic reactions or chemical exposure.
6. Keep Children and Pets Away
During the disinfection process, it is crucial to keep children and pets away from the treated area. Restrict access and ensure their safety by covering food items, kitchenware, and utensils. After disinfection, wipe down surfaces and objects and prohibit human and pet access to the area for a few hours.
By adhering to these safety precautions, you can ensure a safe and effective disinfection process using a fogging machine.
Choose the Right Fogging Machine for Your Needs
When it comes to choosing a fogging machine for disinfection purposes, there are a few important factors to consider. These factors will help you find the right machine for your needs, ensuring effective and efficient disinfection.
1. Size
The size of the area you need to disinfect is a crucial factor to consider. For smaller areas, a handheld fogging machine can be a suitable choice. However, for larger spaces like offices or homes, you will need a machine designed for more extensive coverage.
2. Solution Capacity
The solution capacity of the fogging machine is another key consideration. You will want to choose a machine with a tank size that matches your needs. For larger areas, opt for a machine with a larger tank capacity. This will save you time by reducing the frequency of refills.
3. Price
While budget is always a concern, it’s important to find a fogging machine that falls within your price range while meeting your needs. Fortunately, there are various types and sizes of fogging machines available at different price points, making it possible to find one that suits your budget.
By considering these factors, you can select the appropriate fogging machine for your disinfection needs, ensuring thorough and efficient coverage.
FAQs
Fog fluids primarily consist of deionized water and an active substance like glycerine or propylene glycol. Using mineral or tap water in a fog machine can damage the equipment due to impurities. It is recommended to use high-quality fog fluids specifically designed for fogging machines.
Yes, a fog machine can be used in a house. However, it is crucial to take safety precautions, as the fog will coat everything it touches and require cleaning afterward. Ensure proper ventilation and follow guidelines provided with the machine.
Generally, a fogging machine will not damage carpets. However, if excessive fog is created or low-quality fog fluid is used, there is a risk that it may seep into the carpet, causing minor damage. The choice of high-quality fog fluid designed for indoor use is important to minimize residue and potential damage.
A fogging machine will not ruin electronics, but it can leave a thin coating. After using a fogging machine for an extended period, it is advisable to clean and dry electronics to prevent any potential damage.
To use a portable disinfectant fogging machine, point the fogger at the furthest upper corner of the ceiling and turn it on. Leave a fine mist of disinfectant on every surface in the building, including the ceiling, walls, furniture, and floors. Work the fogger from left to right and up and down as you slowly walk back out of the property. Afterward, unplug the machine and close the door.
Conclusion
Using a fogging machine for disinfectant is a game-changer when it comes to keeping your space clean and germ-free. The ease of use, effectiveness, and time-saving benefits make it a must-have tool in your cleaning arsenal.
So, say goodbye to traditional cleaning methods and embrace the power of fogging machines for a safer and healthier environment. Get ready to fog your way to a cleaner tomorrow!